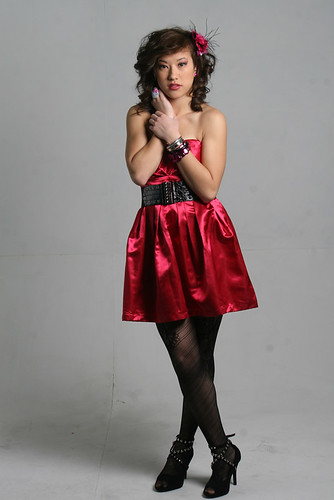
Random Night time Blog: Editing tutorial.
Before: Shot in JPEG
After: 
Hit the jump for a step by step editing process.
NOTE: This look is a high contrast, really desaturated look. Suitable for fashion and what not. So if you don't like this look, I would just move on to something else.
Here's the step by step process on how as of recently been editing photo. Very high contrast, desaturated image to look vintage.
I use Adobe Bridge for organization/workflow and Photoshop Creative Suites 4 for my post processing of images. A basic knowledge of PhotoShop in needed for this tutorial.
1. After the photo in chosen and open the first thing I do is make duplicated the background layer just in case I mess up I can always go back to the drawing board.
2. Then I go to the drop down menu, image-adjustment-exposure and brighten the image up just a bit.
3. I proceed to clean any blemishes off her face and and other parts of the model. I use the healing brush tool for this. I also bring out the eye with the dodge tool on highlights and about 2%. I try not to whiten the white's of the eyes to much because it give that freaky doll eyes look. Then I go over the eyes with the sharpen tool on lighten and about 4% just to bring it out a little bit more.
Optional step here; you can use the paint brush tool, sample a part of the skin for the color and set it on a low opacity and low brush flow to smooth out the skin. I did not know use this step in this photo because in a couple of steps down the line I use a filter to smooth the skin out.
4. This was the longest and most tedious part for the process. The cleaning of the background. Yes the background is just as important as the subject of the photo. If you notice in the in the original photos the background is quite dirty and really noticeable. I use the clone tool and continue sample different parts to get the color just right. The hardest part is the shadows. Still using the clone tool, I clean up the stray hairs as best I could so the photo still looks real.
5. After all the clean and blemish removal is done, I copy that layer and I add surface blur filter. This is to smooth out the skin. I had the Radius and Threshold is set pretty low. Depending on how you want your photo to look the percentages is all up to you.
6. After the blur filter, I mask that layer and bring out the eyes and lips this is this part in the bottom layer. when you done with that. Right click on the mask layer and apply layer mask.
7. Then when you're done with the layer mask, I bring down the opacity of that layer to about 80%. I would put the opacity to about 30% - 80% to keep some detail of the skin. I merge that blur filter layer and background copy layer together.
8. This part is optional, I add a noise filter to the photo. I have the amount set on 7.16%. This is to add more detail in the image. I bring down the opacity on this to about 40%. You can do the amount or opacity to your liking, This is a great option for black and white photos to give it more depth.
9. I do some cross process with layers. This is all for the vintage old faded look.
- Add a curve layer, on the RGB grab the bottom left of the line and move it up a bit. Then with the red and blue do the same. With the blue also grab the middle part of the line and bring it done a bit. The photos should looks a bit yellow.
-Add a Hue/Saturation layer and bring down the saturation. I usually go down to about - 20 or beyond.
-Add a brightness/contrast layer. I brighten up the image to about 10 and the contrast to about 16. * this layer is optional.
-Add another curve layer. and in set it on either multiply, soft light or hard light from the drop down menu. That depends on you. This layer adds more contrast to the photo.
-Add a photo filter layer. I had set mine to blue and at 16% to cool the photo down.
-Add a exposer. This is to add a haze look to the photo. I just mess around with offset and gamma slider.
10. I resize the image and add a unsharp mask filter.
That's pretty much it. I add all the layers because during steps of adding them you can adjust the layer or delete if you need be. If you add it to the image itself and a couple of step down you decide you want to change it or delete it you would have to scrap the image to go back.
That's one photo took be about 25 - 30 minutes. I'm still learning myself but this is what I learned. I pretty much spend more time editing that actually behind the camera. I practice, practice, practice.
But this is my philosophy. Get it right while taking the picture, then if you so desire enhance it in PS.
I learned the cross processing and adding adjustment layers from Lot 8 Studios His images are what I inspire to create.
Latter people. PEACE!!
All images can still be seen on my Flickr account and don't forget to check out my website for all your photography needs. LordSpam.com
What happens in a week, photographically and other wise? Find out.
Thursday, January 07, 2010
Subscribe to:
Post Comments (Atom)
No comments:
Post a Comment