Week 4 - The Uneventful Week.

I always thought this was cool.
Other than the 52 Week Project I didn't do anything. I edited old pictures. Look and you'll find them.
This week was not better than last week. It was about the same.
All images can still be seen on my Flickr account and don't forget to check out my website for all your photography needs. LordSpam.com
Full post here.
Friday, January 29, 2010
Friday, January 22, 2010
Week 3: Not as planned.

^^ Underachiever.
Updating early, No need to think about what picture I need for the week. I had something planned for this week that fell through. Photo above of yours truly is what happens when I want to do something and something doesn't happen. I'm not a model but I'm more than willing to get in front of the camera.
My 365 project is going well. Every picture I write a little something. Maybe technical set-up or just something I was thinking at the time. Go see if you want too.
May be next week will be better.
All images can still be seen on my Flickr account and don't forget to check out my website for all your photography needs. LordSpam.com
Full post here.
Saturday, January 16, 2010
Week 2: The Pretend Assistant

Megan Medellin from my first photoshoot of the year.
Well, I didn't really have anything planned for this week. I went to a couple of photoshoot with some friends and kind of sort of assist them. Not really, I stood around most of the time. Maybe a took a pictures here and there. In actuality I just wanted to hangout.
I did have my video camera with me and let Mario take some video. I did the editing.
I let Lillie borrow the video camera and she did a tour of her Studio with Kiti Kobian.
A tour through her studio.
I was also at Lillie's on Wednesday and shot some behind the scenes footage of her shoot with Anna Van Sambeck. Video coming soon.
On Friday
I had a last minute put together shoot with Megan Medellin. And where would it be but in Lillie's studio. This was the first shoot I had this year. I'm kind of a liar and told myself that I only wanted to use one light but ended up using 2, One as hair light. The image below is a one light photo though. 
I'm pretty sure if you're fairly familiar with lighting you can figure it out but here's a diagram of the lighting setup. I used strobox application on my iPhone for the diagram.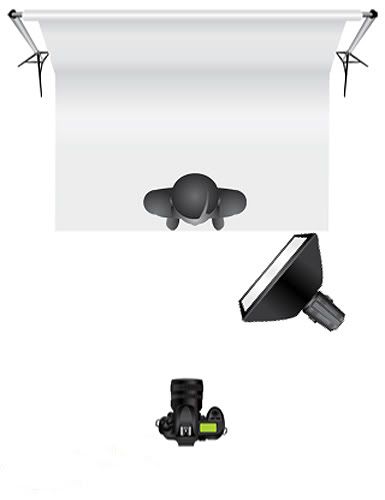
After my shoot, Lillie had a shoot with Stephanie Ann Cook. I help out a little bit. Pretty much just held things up while Lillie made a tutu dress type thing. I saw some preview of the that photo set and they look amazing just from the back of the camera. Can't wait to see the finished photo.
That's was my week. Till next time. PEACE!!!
All images can still be seen on my Flickr account and don't forget to check out my website for all your photography needs. LordSpam.com
Full post here.
Monday, January 11, 2010
Random Late Night Blog - Editing Again

Screen capture of sample editing.
Well, I just figure out that the Mac lets you do screen capture without any additional software. Rad, dude. So the picture above is an example of the layers I've been using lately. I was going to explain it step by step but I'll do that on a later date.
All images can still be seen on my Flickr account and don't forget to check out my website for all your photography needs. LordSpam.com
Full post here.
Saturday, January 09, 2010
Random Late Night Blog -Bokeh with the NIkkor 35mm f/2.0D AF
So I was pretty bored and decided to play with the depth of field on one of my lenses, bokeh for you photography nuts.
photo specs.
ambient light
Manual exposure
ISO 640
Shutter speed @ 1/60
fstop @ f/2.2
Foreground
Background
The bokeh that this lens produces is beautiful. Didn't even stop all way down and still get nice shallow depth of field.
Photo specs:
Ambient light
manual exposure
ISO 200
Shutter speed @ 4 secs.
fstop @ f/20
Even at f/20 the sharpness of this lens is outstanding.
I hate reviewing shit but this Nikkor 35mm f/2.0 is great at low light situation and tact sharp. The AF is superb and quick to respond. As for the actually construction of the lens, it feels really sturdy. Compared to the nikkor 50mm f/1.8 this has a considerable amount of weight to it. This has been on my camera since the day I got it.
Maybe one day I'll get a Nikkor 85mm f/1.8. Hopefully.
All images can still be seen on my Flickr account and don't forget to check out my website for all your photography needs. LordSpam.com
Full post here.
Week 1: 2010 edition.

Another beginning.
Yes sir, it's a New Year. I actually finished the 52 week project 2009 which is not to shabby. Man, that really flew by fast. I'm starting another 52 week project 2010. Same concept, different attitude. Instead of mostly models, which is most of what I did last year, this year will be a bigger variety of photos.
I've decide to take at least one of my cameras everywhere I go. I'm doing so in hopes of capturing something interesting. I'll try and shoot everything. See how it goes here: 365 project.
Also started a new fashion blog (kind of). It's about what everyday people wear on a daily basis. Something like that. Hopefully it will updated once a month. Check it out here: HBP with Fashion
Aight, later.
Full post here.
Thursday, January 07, 2010
Random Night time Blog: Editing tutorial.
Before: Shot in JPEG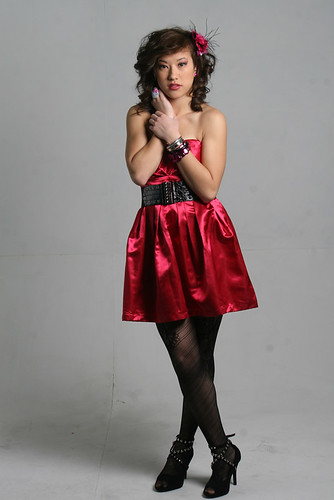
After: 
Hit the jump for a step by step editing process.
NOTE: This look is a high contrast, really desaturated look. Suitable for fashion and what not. So if you don't like this look, I would just move on to something else.
Here's the step by step process on how as of recently been editing photo. Very high contrast, desaturated image to look vintage.
I use Adobe Bridge for organization/workflow and Photoshop Creative Suites 4 for my post processing of images. A basic knowledge of PhotoShop in needed for this tutorial.
1. After the photo in chosen and open the first thing I do is make duplicated the background layer just in case I mess up I can always go back to the drawing board.
2. Then I go to the drop down menu, image-adjustment-exposure and brighten the image up just a bit.
3. I proceed to clean any blemishes off her face and and other parts of the model. I use the healing brush tool for this. I also bring out the eye with the dodge tool on highlights and about 2%. I try not to whiten the white's of the eyes to much because it give that freaky doll eyes look. Then I go over the eyes with the sharpen tool on lighten and about 4% just to bring it out a little bit more.
Optional step here; you can use the paint brush tool, sample a part of the skin for the color and set it on a low opacity and low brush flow to smooth out the skin. I did not know use this step in this photo because in a couple of steps down the line I use a filter to smooth the skin out.
4. This was the longest and most tedious part for the process. The cleaning of the background. Yes the background is just as important as the subject of the photo. If you notice in the in the original photos the background is quite dirty and really noticeable. I use the clone tool and continue sample different parts to get the color just right. The hardest part is the shadows. Still using the clone tool, I clean up the stray hairs as best I could so the photo still looks real.
5. After all the clean and blemish removal is done, I copy that layer and I add surface blur filter. This is to smooth out the skin. I had the Radius and Threshold is set pretty low. Depending on how you want your photo to look the percentages is all up to you.
6. After the blur filter, I mask that layer and bring out the eyes and lips this is this part in the bottom layer. when you done with that. Right click on the mask layer and apply layer mask.
7. Then when you're done with the layer mask, I bring down the opacity of that layer to about 80%. I would put the opacity to about 30% - 80% to keep some detail of the skin. I merge that blur filter layer and background copy layer together.
8. This part is optional, I add a noise filter to the photo. I have the amount set on 7.16%. This is to add more detail in the image. I bring down the opacity on this to about 40%. You can do the amount or opacity to your liking, This is a great option for black and white photos to give it more depth.
9. I do some cross process with layers. This is all for the vintage old faded look.
- Add a curve layer, on the RGB grab the bottom left of the line and move it up a bit. Then with the red and blue do the same. With the blue also grab the middle part of the line and bring it done a bit. The photos should looks a bit yellow.
-Add a Hue/Saturation layer and bring down the saturation. I usually go down to about - 20 or beyond.
-Add a brightness/contrast layer. I brighten up the image to about 10 and the contrast to about 16. * this layer is optional.
-Add another curve layer. and in set it on either multiply, soft light or hard light from the drop down menu. That depends on you. This layer adds more contrast to the photo.
-Add a photo filter layer. I had set mine to blue and at 16% to cool the photo down.
-Add a exposer. This is to add a haze look to the photo. I just mess around with offset and gamma slider.
10. I resize the image and add a unsharp mask filter.
That's pretty much it. I add all the layers because during steps of adding them you can adjust the layer or delete if you need be. If you add it to the image itself and a couple of step down you decide you want to change it or delete it you would have to scrap the image to go back.
That's one photo took be about 25 - 30 minutes. I'm still learning myself but this is what I learned. I pretty much spend more time editing that actually behind the camera. I practice, practice, practice.
But this is my philosophy. Get it right while taking the picture, then if you so desire enhance it in PS.
I learned the cross processing and adding adjustment layers from Lot 8 Studios His images are what I inspire to create.
Latter people. PEACE!!
All images can still be seen on my Flickr account and don't forget to check out my website for all your photography needs. LordSpam.com
Full post here.
Monday, January 04, 2010
Random Early morning blog: Shooting the moon.
Kind of tutorial on shooting the moon. Hit the jump to learn more.
When I first started taking pictures with a dSLR I took the per-requisite pictures of Sunset/Sunrise, Flowers, inanimate objects, Landscape and at night of course I did the moon.
And like all beginners, I didn't know what I was doing but I had a decent camera and I thought I knew the jest of it. Here's was what I was thinking then. Since It was at night I need long exposure time and wide open aperture. The moon is far away so I need the longest lenses I have. So I went to the tallest parking garage I could, set up a tripod and starting firing away. 
I thought I got some good shots but as I was looking at other shot of the moon from other photographers, Yes, they look cool with all the clouds and stuff but I was wondering where all the detail was. Pretty much the only thing I got right was the long lens.
I've ask other photographers for help and their answers made a lot of sense. So I'll share it with you guys.
This is the question I ask; Why is the moon looking like a big glowing dot in my photos?
It's because it's reflecting the light from the sun. The sun is the most powerful lights source we know, even at 18% and reflecting off another surface, it's still pretty bright. You have to treat shooting the moon like shooting the sun, kind of. To minimize the light you have to stop down you f-stop and run your shutter fairly fast. Also you don't need to up your ISO since doing so will let more light is being capture by the film or in most cases nowadays, a digital sensor. Just keep it around 100 or 200 ISO. You don't even need a tripod since the shutter speed is fast enough to be hand held.
I tried it with the advice given to me and it worked out pretty good. 
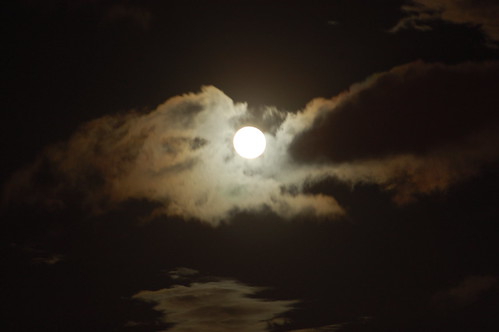
I totally can't remember any of the shots above shooting info, such as shutter speed and aperture but I shot the moon again just a few hours ago and here is the data.
D300
Manual exposure
Tamron 70-200 f/2.8 @ 200mm
ISO 200
f/8
Shutter speed -1/200
Shot around 1:30am
I was standing in zero level at the airport, I should have actually went to the top of the parking garage which would have gotten me closer to the subject. I keep the aperture at f/8 since most lenses sweet spots for focusing is at f/8 - f/11. Also since your not getting any other background in the shoot it didn't make a difference to control your DOF. Just keep the aperture there and adjust the shutter speed accordingly. Only thing I did in post was crop the image.
I took only 2 shots and the photo above is the second of the 2. I would have taken more shot but I was on my way home from work and didn't want to dwell in the middle of the road.
I hope this was helpful. Give it a try. Practice makes perfect.
Till next time. PEACE!!
All images can still be seen on my Flickr account and don't forget to check out my website for all your photography needs. LordSpam.com
Full post here.
Subscribe to:
Posts (Atom)